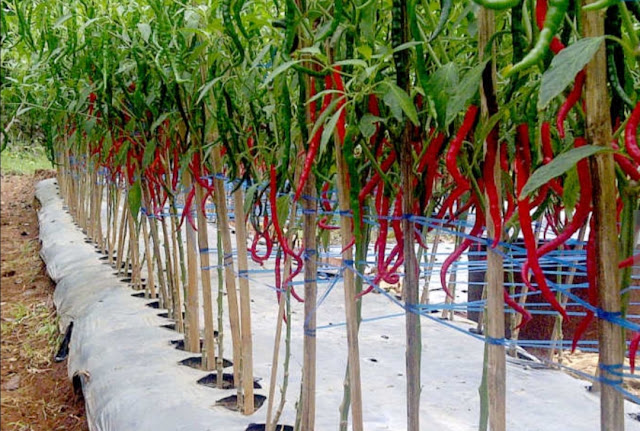
4 Stages of Cultivating Curly Chilies that Fruitful
Until now, there are still many who ask about how to cultivate curly chilies that bear fruit. This indicates that this agricultural commodity is still in great demand.
Whether it's a novice farmer or someone who has changed professions, or someone who has been cultivating for a long time, the results have not been maximized. We know, chili plants are plants that often get pest and disease disturbances.
For that, Dwi Purwanto here tries to share information about the basics of how to cultivate curly chilies well.
In general, the cultivation techniques between one farmer and another are similar, starting from land preparation, seed preparation, planting and care, to harvesting and post-harvest handling.
Also read: Classification and Morphology of Bean Plants
Even so, some of them do it in a slightly different way, mainly because of the type of curly chili they grow.
Generally, curly chilies can grow almost anywhere, but for optimal results, there are types of chili for the lowlands and highlands.
One thing we must understand is that success in curly chili cultivation must be seen widely, starting from cultivation techniques, harvest and post-harvest handling, as well as marketing.
However, for our current writing, only focus on cultivation techniques. Let's see together, what is the method of cultivating curly chilies that bear fruit?
Land Preparation & Curly Chili Seeds
Some things that we must pay attention to in land preparation are:
- Planting schedule, that is, we prepare the land 30 days before planting. At the same time, we also prepare the nursery business.
- Pay attention to the land to be planted, including the highlands or lowlands. Then, adjust it according to the type of curly chili seeds.
- The land that we will use is also not former chili plants or other chili families , such as tomatoes, eggplant, takokak, and potatoes.
Planting Curly Chili
Regarding seeds, some things to pay attention to are:
- Choose certified seeds to ensure good quality.
- Check the expiration date. Don't use the ones that are out of date.
- Use seeds with brands registered with the government.
Land Processing
Some land management steps that must be carried out when cultivating curly chili are:
- Loosening the land by hoeing or using a tractor.
- Make sure the ground is completely upside down. What was originally at the bottom can be lifted, and what is above rolls down.
- Make sure this loosening process produces a loose, hollow cultivated soil.
- After that, make a bed with a width of 1 meter times the length (according to the land area).
- The height of the soil bed is about 20 cm. Bed distance between 25-30 cm.
- After that, the soil bed (a kind of short elongated dike) is covered with plastic mulch. Choose a two-sided type, one side is silver and the other side is black.
- For your information, in installation, the color is silver on the surface. The goal, the color will reflect light and heat that can kill plant pests.
- Then the plastic bed is made a hole with a distance between the holes about 20-25 cm. This bed hole will be used to plant curly chilies.
- To ensure plastic mulch can cover the land tightly and perfectly, it is necessary to peg/peg at each end with bamboo so that it does not open when exposed to wind or rain.
Seedlings of Curly Chilli
To ensure the quality seeds that we have selected can grow optimally, there are several important things that must also be considered:
- The seeds that have been removed from the packaging, we dip into the water. Seeds that float, we separate. Normally, these floating ones wouldn't grow
- Submerged curly chili seeds, we soak for some time (or follow the instructions on the package)
- After soaking, drain and put into the seedling media that has been prepared previously.
- Media in the form of a mixture of fertile soil and manure packaged in small polybags or using pot trays (special seeding pots)
- Normally, before 1 week, chili seeds begin to germinate. At that time, sprinkle certain drugs so that the chili seeds are not eaten by snails or other plant pests.
- Chilli seeds are ready to be transferred to beds after a minimum of 14 days.

Maintenance
One more step, so that the cultivation of curly chilies that bear fruit is successful, then what we have to do is plant care.
- Watering 2 times a day morning and evening or as needed. If it's the rainy season, if it's not needed, then there's no need
- Fertilize as needed. For example, if you use a Phonska fertilizer solution (a mixture of 1 liter of Phonska with 30 liters of water), 1 cup of curly chili is enough to add (250 ml).
- Fertilization is done once every 1-2 weeks. Stop when it starts to bear fruit.
- In order for fertilizers to work optimally and plants to be free from pests, it must be diligent to clean the plant land from weeds.
Those are the 4 stages in curly chili cultivation that you need to know. How are you friends? Are you interested in cultivating it? Don't forget to SHARE this article with your friends!


Post a Comment for "4 Stages of Cultivating Curly Chilies that Fruitful"